 |
||||||
 |
||||||
 |
||||||
Copyright © 1996-2003 Sarah Henderson.
Last updated 14 October 2003

This little guide is intended to share what I have learned from creating a small home network of two PCs running Windows 98.
![]()
hardware
There are a number of ways to go about connecting two PCs together. You can connect their serial ports, you can connect them through the telephone network, or you can connect them via network cards and cable. The connection through network cards and cable can be done with or without a network hub (a device through which all network traffic passes). The network card without a hub is the approach that I decided to use. It gives good performance, can be extended to more than two PCs, and is not difficult to set up and not too expensive.
To create the network then, you first need each PC to have a network card installed. Some PCs come with these, so check your computer manuals before you go out and buy one. However, you can but one for less than NZ$40 at most electronic or computer shops (such as Dick Smith Electronics).
They usually come with good installation instructions, so don't worry - it's no harder than installing new RAM. Once all your cards are installed, you can move on to the cabling.
There are also networking kits available. They usually include all the required
hardware, cabling, and come with good instructions. Some include two network
cards and a network hub and can be extended to network up to four or five
computers. These are usually around NZ$200, so are a bit expensive, but may be
less hassle. There are also kits with two network cards and a cable for around
$60 - but these can only be used for two computers. Dick Smith Electronics is a
good place to buy these things, and they can often give help and advice on the
setup as well.
cabling
There are two types of cables used to network computers, one is called Coax or coaxial cable (sometimes referred to as Ethernet), the other is Unshielded Twisted Pair (UTP). These use different connectors to plug into the network card, so you need to check which type of connector your network card uses.
Ethernet cable uses a connector called a BNC connector, which will look like a round metal plug sticking out of the back of the network card.
UTP uses a connector called an RJ-45 connector, which will look like a slightly wider version of the modem cable that plugs in to the back of your computer.
If your network card has BNC connectors, it will usually come with something called a T-connector (which looks like a T shape with three plugs), or you can buy one for a few dollars at an electronics shop. You plug this onto your network card and then you can buy a standard pre-cut length of Coax cable, which includes the connectors on the end (about NZ$20 for 5m). You then attach this to one side of each T-connector, and on the unused side of the T, you put something called a terminator (again just a few dollars each). If you need to add another computer to the network, you just take off one terminator, and add another length of cable to the T-connector of the other PC.
If one or more of your network cards has only RJ-45 connectors, things are a
bit more difficult. UTP cable (which uses RJ-45 connectors) is really designed
for connected a computer to a hub, and if you are connecting more than two
computers, you will have to use this method. It is possible to connect two (and
only two) PCs with a special UTP cable called a 'crossover cable'. These are
not stocked in most of the electronics shops I tried, so you may need to ask
for it to be ordered in.
software
Once the hardware setup is complete, you now need to set up the software. You do not need any special software to set up your network, you can use the networking capabilities of Windows 98. You will need to perform the following steps for all the PCs you want to network.
First you should open the control panel, and double-click the 'Network' icon. You should see a device icon with the name of your network card, and also another icon which says TCP/IP -> then the name of your network card. If this is not there, you will have to click Add, then choose Protocol, then choose Microsoft, then TCP/IP. You will probably then have to put in your Windows 98 CD.
Below this you will see a button labeled 'File and Print Sharing...' Click this and check the items you want, (probably both if it is your own network).
Next click the 'Identification' tab, and give the computer a meaningful name,
so you can identify them. Also, make sure all the PCs have the exact same
workgroup name. Click OK to close the dialog box, and close the control panel. 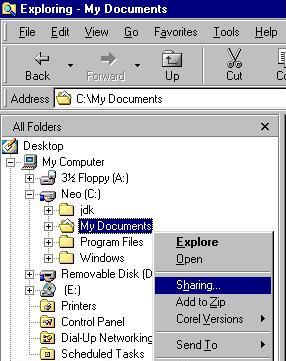
Next, you specify what you want to share. You can share either the whole drives
or specific folders, and you can also assign password protected access if you
like. To set sharing for a drive or a folder, just right click it in either
Windows Explorer or My Computer, and click the 'Sharing...' option. In the
dialog box that pops up you can choose, whether or not to share it, give it a
meaningful name, choose whether to give read-only or full access, and set the
passwords. An example is shown below. 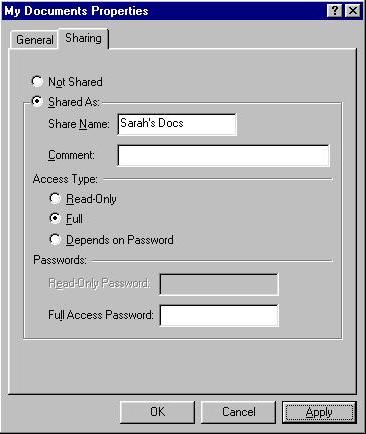
Once you have completed these steps, your network is set up. If you have any
trouble at any stage, you can use the 'Network Troubleshooter' in the Windows
help system to fix problems. Lastly, please remember that I am not a networking
expert. I can't take responsibility for your system, so if you're unsure about
anything, consult your local computer guru and/or the manuals that came with
your hardware.
summary
Total cost of 2 PC network with hub: approx NZ$200
Total cost of 2 PC network without hub: approx NZ$80
Total time to set up network: about 3 hours